Is video editing costly? No. You can edit your YouTube videos from YouTube video editor for free and trust me, the process is super easy.
From the editing options, you can quickly trim your video from the beginning, ending, and middle. Ad music, ads in between videos, and suggest relevant videos at the end. So, let’s not waste time and get into the main part. I will show you how to edit YouTube videos like a professional.
Why Editing Videos Necessary
Many video makers say editing videos is harder than creating them. However, you must keep video editing on your to-do list before uploading it to your YouTube channel. Here are the reasons:
- Remove any mistakes. While creating videos, we make mistakes and say many things that feel unnecessary. Thus, editing videos will help you edit any mistake you made in between videos and also, ensure that you create videos hassle-free.
- Enhance video quality. Adjusting hue, brightness, saturation, and contrast improves video quality, providing your audience with a great experience.
- Increase viewers and subscriptions. When your videos are properly edited and portray the message clearly without distraction, your viewers and subscriptions will increase automatically.
- Adding transitions and effects. Editing videos for YouTube with transitions and effects allows you to portray your video tone better and set the setting. However, ensure the effects match the video topic you are covering.
- Enhance engagement. When you remove mistakes and portray organized messages with visual and auditory effects, your audience will enjoy your videos, increasing engagement as a result.
How to Edit YouTube Videos in 7 Simple Steps
YouTube video editor is a great basic editing tool. It is super easy to use and editing features are easily understandable. So, let’s start the process!
Access YouTube Video Editor
You can find YouTube video editor in two ways.
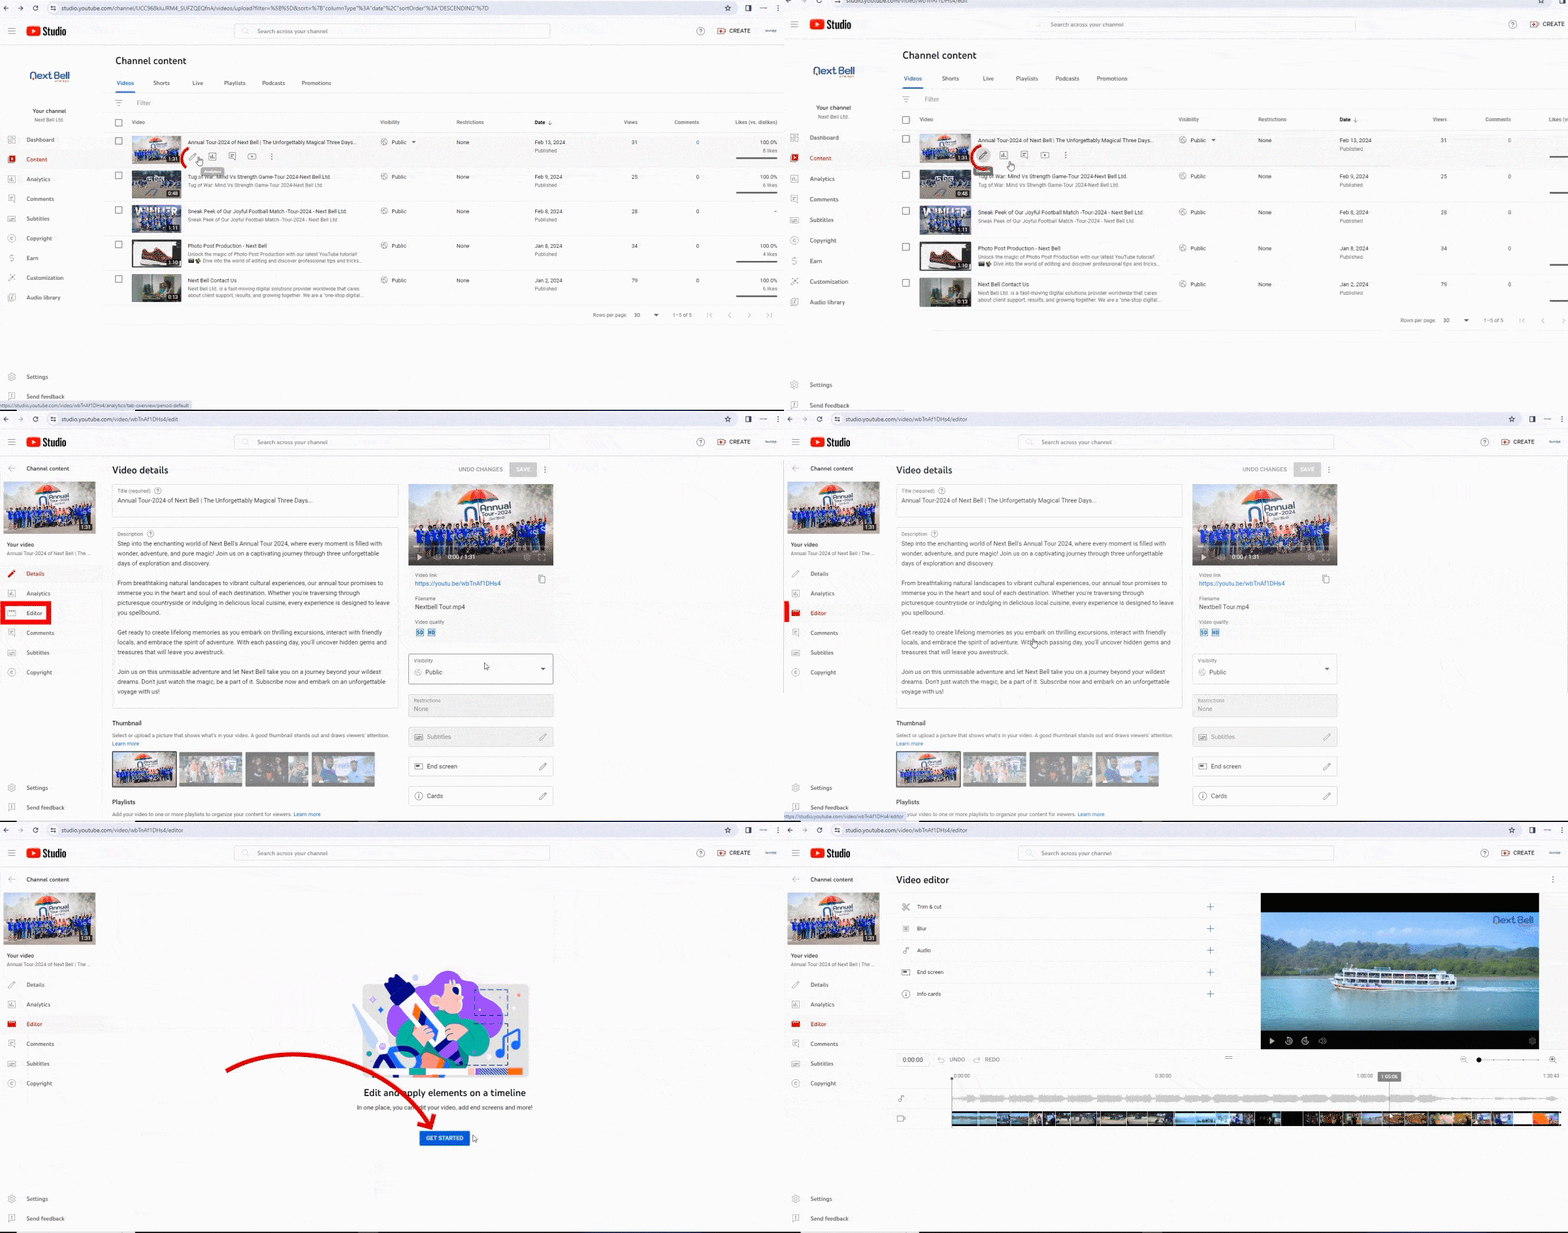
- Sign in to YouTube Studio- Go to your channel dashboard area- Click Content- Choose videos from the options and choose the video you want to edit- The video details will open- Choose Editor in the left corner. The video is going to open in the YouTube video editor. You can start the editing.
- Another method is to Go to your YouTube channel- Click on the Video option and choose the video you want to edit- from the title below choose “Edit Video”- Video details will open- Choose “Editor” from the left corner- Your video will open in YouTube video editor. Begin the editing.
Trim and Cut Your Video (Begining, Ending, & Middle)
Cut and trim your video from beginning and end.
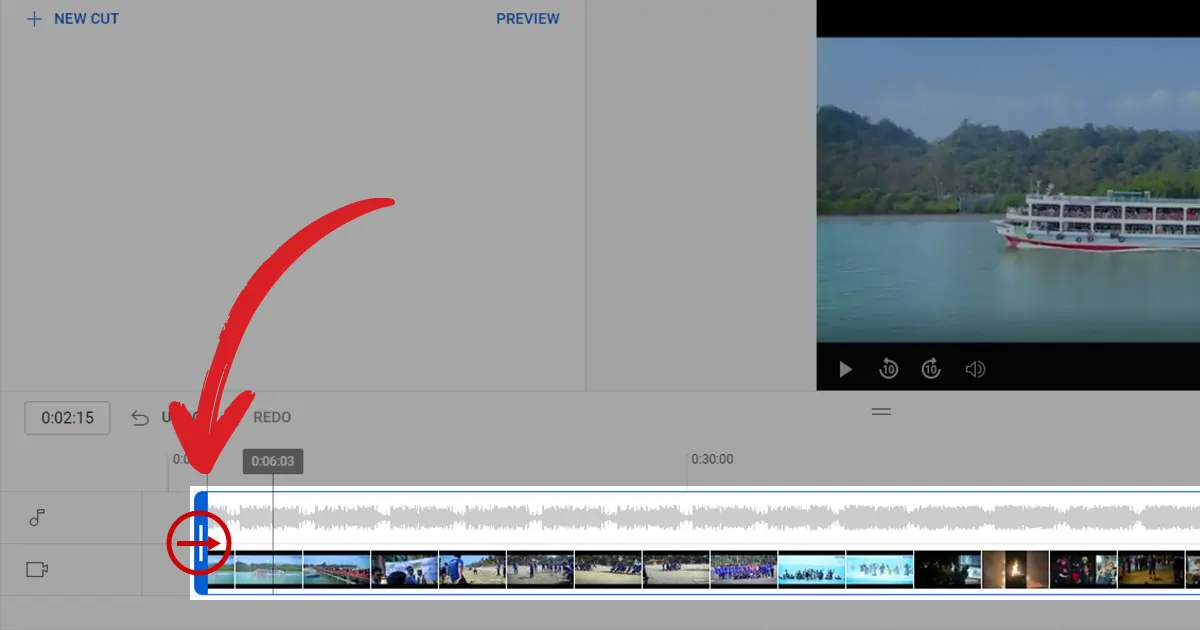
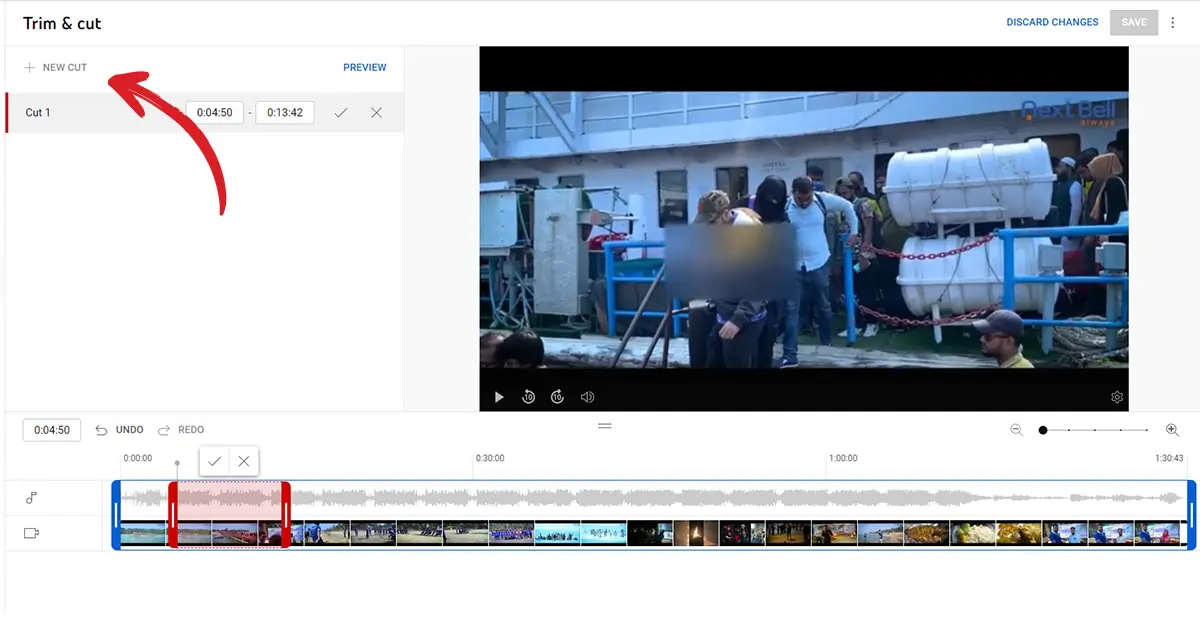
- Choose Trim & Cut from the video editor option. A Blue handle will appear at the beginning and end of the video. If you want to edit the video from the beginning, take the cursor at the blue handle. Upon taking the cursor, it will change to an arrow. Click and drag the arrow to the point you want to edit.
- Follow the same process with editing the end. Take the cursor at the ending and when it changes to an arrow, drag it backward to where you want to finish the video. If you see a space has been made at the places you edited, those places have been removed from the video timeline.
We have seen how to trim clips at the beginning and end of the video. Now let’s see, how to edit YouTube videos from the middle. The process is a bit tricky but easy enough to remember after a few tries.
- To trim clips in the middle, click on the place you want to edit. The playback marker will appear there. Now, go to the trim and cut option in the top left corner. Choose the +New Cut option. A red handle will appear on the playback marker area. Click and drag the finishing red handle and the dragged area will be removed.
- When you are happy with the editing stop-motion videos, click the cut check box. However, one thing to keep in mind, you can not reposition the cut video and only cut it or remove it from its usual place.
Note: You can undo or redo the editings by clicking the undo or redo option or discard changes, it will bring back all the edits.
Blur Faces or Any Object
If you do not want to show any person’s face or object, use this cool feature of the YouTube video editor.
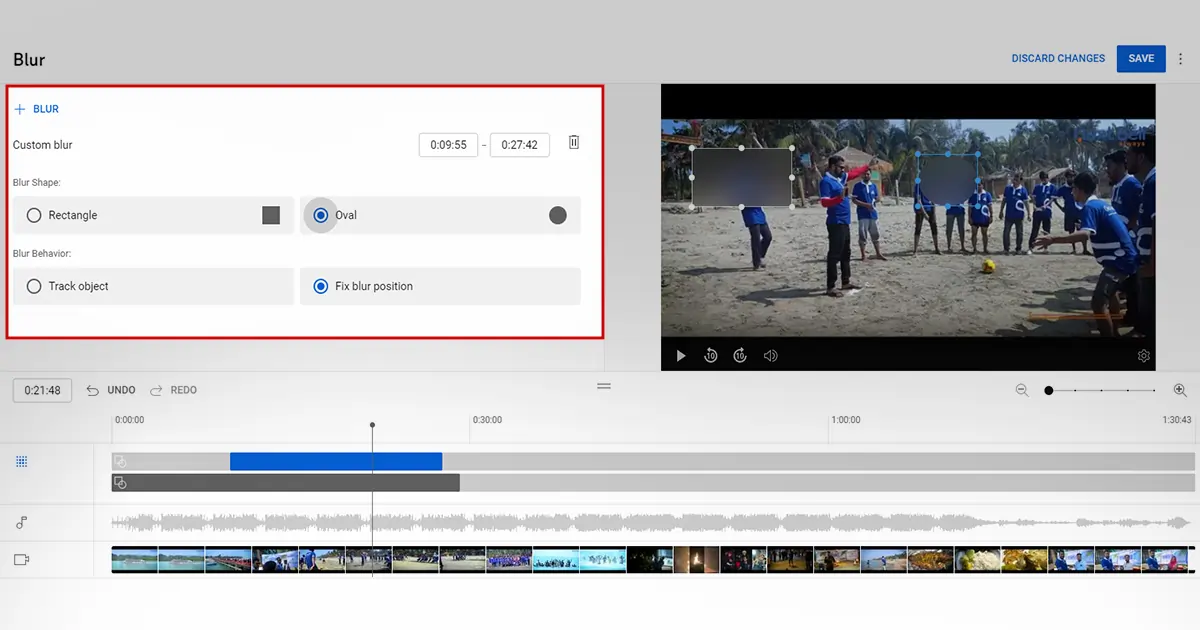
- Click on the blur. Two options will appear Face blur and Custom blur. If you choose face blur, it will automatically detect faces and blur them. It takes time but it is a great option if you shoot videos in crowded places.
- On the other hand, if you choose custom blur, you can blur out people and objects and choose the blur time too. Choose the blurred shape like a rectangle or oval. Select blur behavior like track object or fix the position. If you choose track objects, it will only appear on the chosen object, however, if you fix position, it will track anything and stay in the same position. Thus, I recommend using track objects for blurring.
- If you want to blur more than one object in the YouTube video, Click (+Blur) options. Drag the blurring shape to the object and choose tracking object so that anytime the object appears it gets blurred. This way you can blur multiple objects at the same time.
- You can also choose how long you want the blur to stay on the object. Click and drag the playback marker to the position where you want the blur to vanish. Click Save to save the changes.
Add a Music Track to Engage with the Audience
Adding a music track to your video enhances audience engagement. Thus, follow this method to add copyright-free audio.
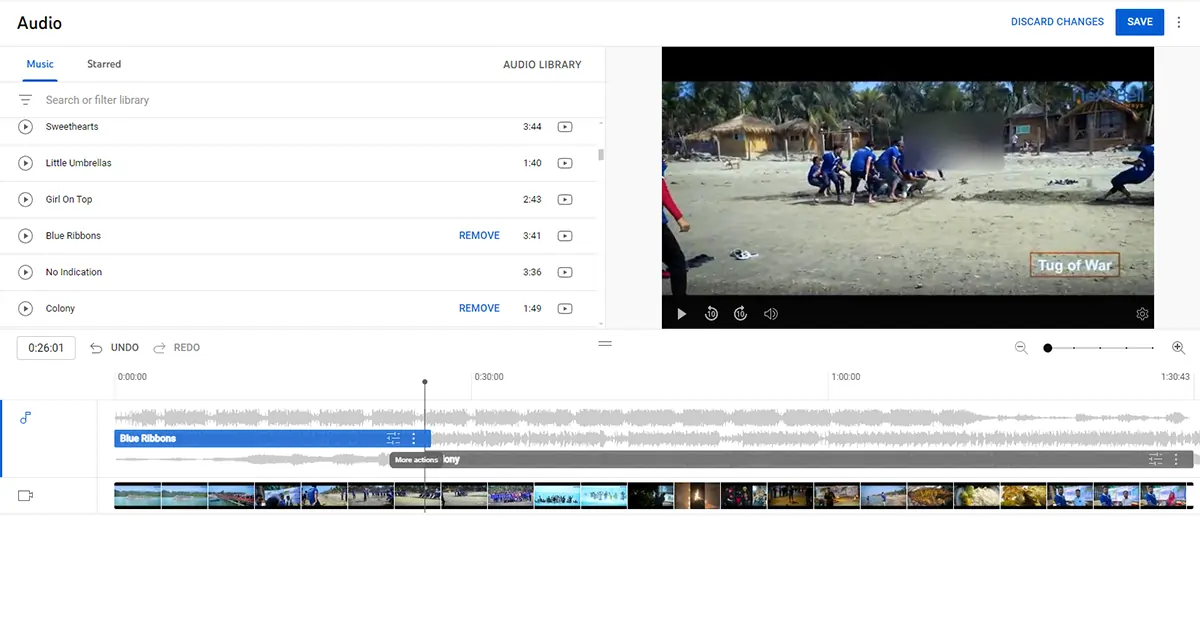
- Click Audio. A huge library of songs will appear. You can choose from the library or if you know the song name, write it on the search bar.
- Click on the song and it will appear at the start of the video. If the song does not cover the whole video or you want to add more music tracks, choose more songs from the library.
- By default, the songs are going to appear at the start. However, you can click and drag the music track to your desired place.
- You can also cut the music. Place the cursor on the music end or beginning. When the arrow mark appears, trim the music.
- Adjust the volume level. By default, the music volume stays at 100. If you do not lower it, the audience will not be able to hear anything you say and leave. Thus, click on the adjust mix level and lower the volume. When you think your voice and music mix well, you are good to go.
- To make your music track copyright-free, Click on the three dots and choose the license info. It will credit the videos to their original singers. Click done. Lastly, click save to save the changes.
Add Info Cards to Increase Interactivity
You can pop up info cards anywhere in the video. It is like putting a link to relatable videos.
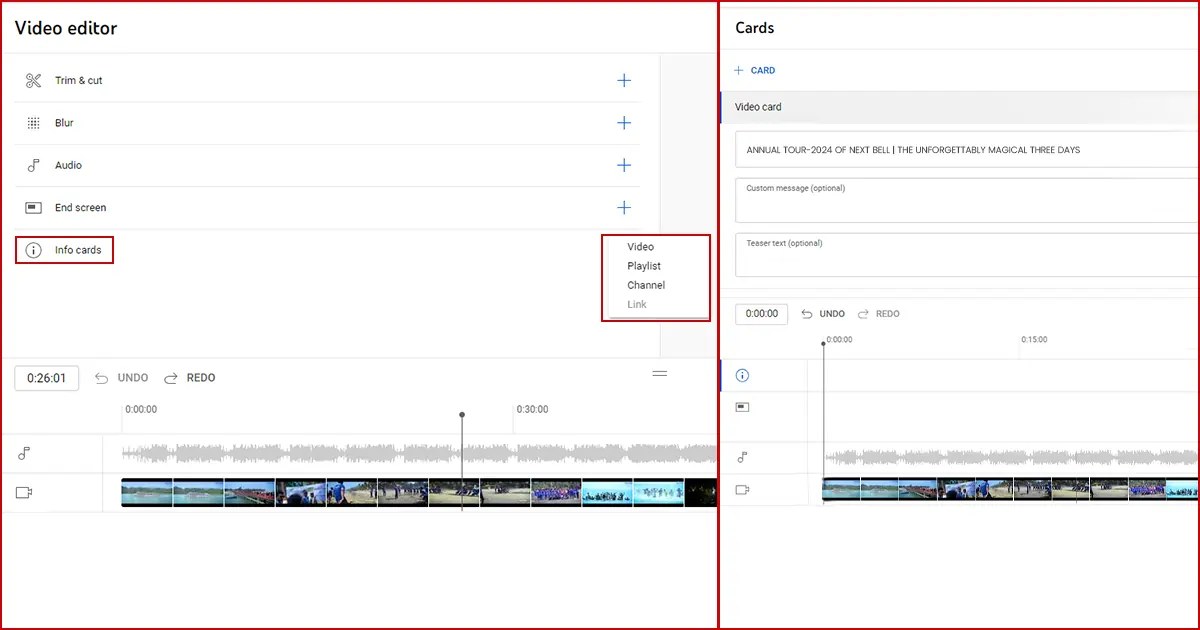
- Click on Info Cards. Some options will pop up like video, playlist, channel, link, etc.
- Choose the option you want to put in your video. For example, you want to add another video that is related to a section. Click and drag the video to that section. When the video is played, the video link will pop up at the top right corner.
- This method helps the audience stay engaged longer in your YouTube social media.
Adding Videos in the End Screen
You may have seen in other YouTube videos that when the video ends, the subscription link and other video recommendations pop up on the screen. Those are clickable links that guide your audience to other videos. You can do that in your YouTube videos as well.
- Go to Video Editor and choose End Screen Edit. Two options will appear at the end of the video. Click on Video and one video will appear on the screen. You can add two video links on the screen.
- To add a second video on the screen, Select +Elements. Some options will pop up like video, channel, link, etc. Click on the video and choose a specific video. Then select the video that is relatable to the video you made. You can resize the videos and place them anywhere on the screen. Also, add your subscription button by clicking the second option “Subscribe” on the editing panel.
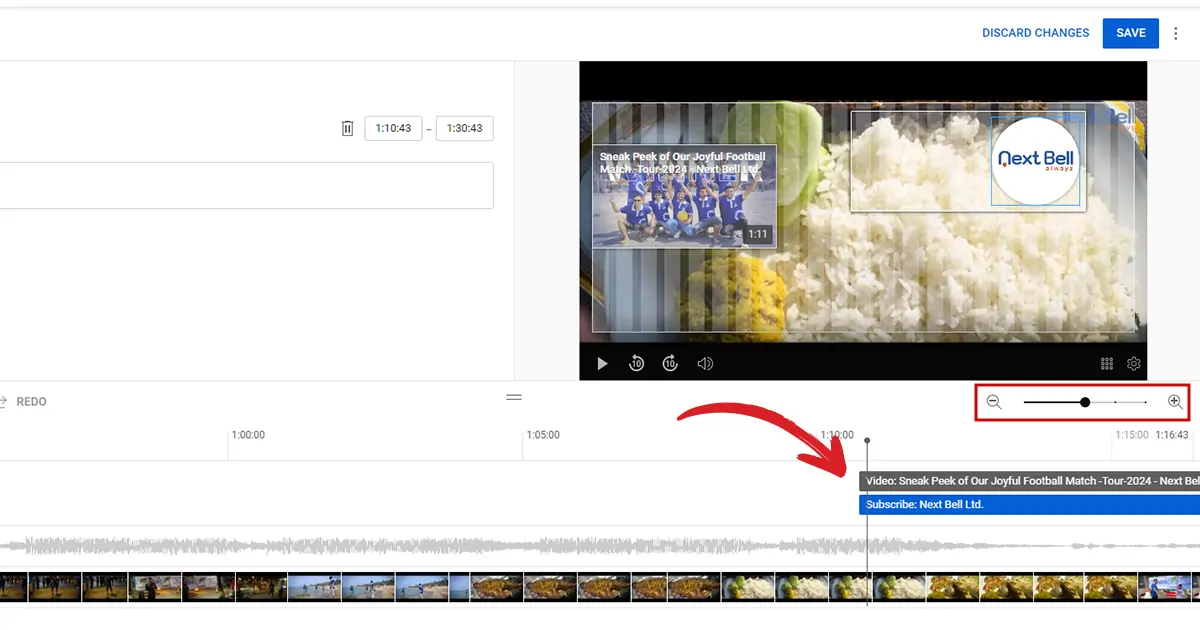
- You can also select the timing of appearing the videos. The end-screen videos usually pop up for the last 20 seconds. So, you can choose which one to appear first. Zoom in to see videos and timings. Click and drag the videos and subscription key and they will pop up according to your set time. For example, a subscription appeared first then 2 seconds later videos appeared.
- Click Save to save the changes.
Ad Breaks
If you are in YouTube partner programs, you can customize or add ads automatically to your YouTube videos.
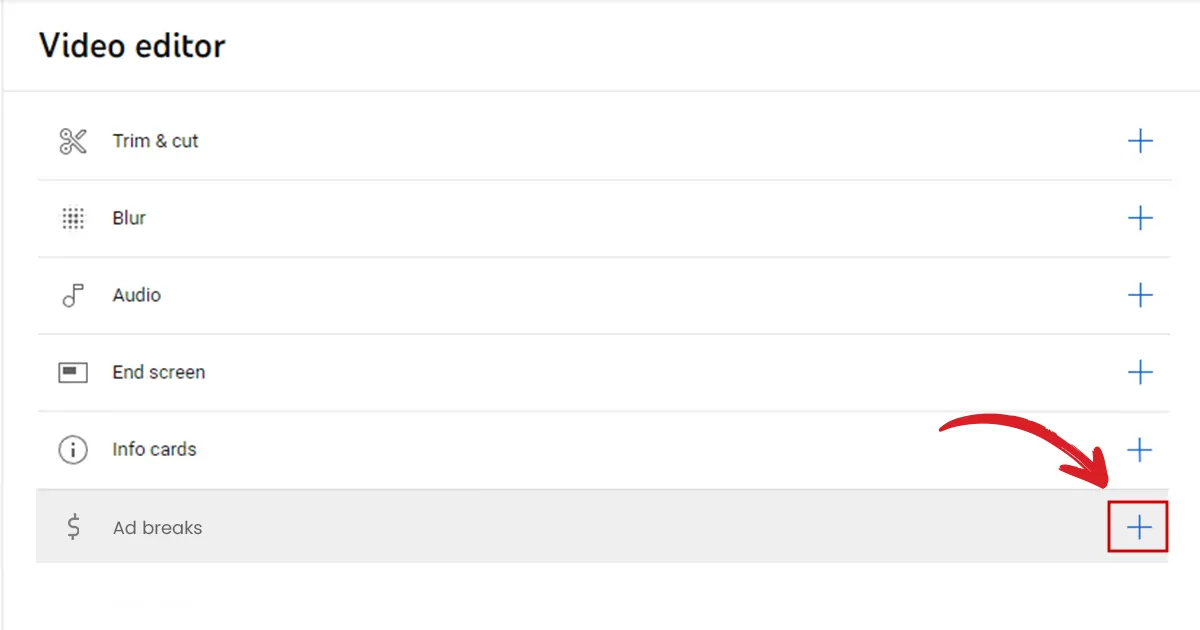
- Click on Ad Breaks Edit from the video editor. According to your video length, you will be provided ad breaks at different times. If your videos are long enough, you can add extra ads somewhere you like. Click on Ad Break and click on the position you want to start the ad. All the ads will be started at the allocated time.
- You can also choose “Place Automatically”. It will remove any ad timing you have placed and add ads wherever Google wants. The advantage of this method is you do not have to think hard about where to put your videos. The disadvantage is it can be placed in any place which may distract the audience from an important moment.
Keep These Things in Mind While Editing Videos
While learning how to edit YouTube videos will help you create high-quality videos, you need to add more things to stand out and get found on searching. Read the below points to ensure you have included these before uploading your video.
- Tell Story Chronologically. You need to maintain a chronology while editing videos. Your videos need to have a proper beginning, middle, and ending. The audience should not feel lost. Keep the flow and ensure one clip is guiding the other clip.
- Design Engaging & Relevant Thumbnails. Thumbnails are the first thing that appears after searching. Thus, whether the audience clicks on the video or not will depend on how engaging your thumbnails are. Choose an image or a moment from the video, and edit the image in post-production ensuring it is visually captivating.
- Use SEO-friendly Titles and Descriptions. Conduct YouTube keyword research to appear in the top search results. You can use tools like vidiQ and Keyword Analytics for YouTube. These tools are dedicated to YouTube keyword research and the keywords appear based on audience search queries. Take keywords related to your topic and make attractive titles and descriptions.
- Follow Trends. Add relevant trending elements like memes, images, animations, and music to your videos. Ensure the elements complement the videos and make them fun and engaging.
- Keep Your Videos Simple. Remember, simple videos sell the best. Whether you have just started editing your videos or you are a pro, if you can convey the message simply, the audience will love your videos. Thus, no matter how long or short the video you make, ensure the message is clearly portrayed.
- Make Shorts. YouTube Shorts are thriving now. People watch shorts more than long videos. Thus, uploading shorts is a great way to attract the audience to your YouTube channel. You can take moments from your videos and turn them into shorts. To invite people to watch the full video, leave the link in pinned comments.
- Check Audio Quality. When you add a music track to your videos, ensure it goes with the video and your voice can be heard properly. If you can tune in audio properly, video will be more fun to watch.
- Add Relevant Video Links. Just like adding video links in info cards and end screens, you can add relevant video links in the description box or pinned comments. However, mention it in your video so that the audience can check the description links.
- Keep Consistency. When you upload videos, follow a schedule like uploading two videos a week or one video. This method will help you in the long run and build a trustful relationship with your audience.
- Do not Forget to Take a Rest. Increasing views and subscriptions every day makes you feel enthusiastic to make more videos, right? However, you need to take care of your health too. I suggest you make a strategy like making 5 to 6 videos beforehand. So that you can take a rest or go on tours while uploading videos on the way.
Video Editing Software Suggestions As Alternatives
Here are three alternatives to YouTube Video Editor. You can use these video editing tools for free and their features are updated and easy to use. Check them out!
OpenShot
Editing videos with OpenShot is free and easy. You can add texts, 3D animated effects, and slow-motion effects, and take titles from OpenShot templates from the editing software’s vast collection.
The best features of this software are it has curve-based keyframe animation, 3D animation effects, great video transitions, unlimited music tracks, watermark-free video exports, title and subtitles templates, and available in 70+ languages. However, some disadvantages are it is not available in the mobile app and the animations are a bit outdated.
Descript
Descript is a free text-based editing tool. Read the script and edit pauses, other texts, and audio. You can use premium video editing features for free. The best features of this video editing software are filler word removal, AI features, remote recording, studio-quality sound, screen recording, etc. You can also clone your voice with AI.
The advantage of Descript is it is user-friendly, has standard AI features, is collaborative, also provides editing tutorials. However, you can not edit on Android or iOS devices and it is compatible with Browser, Mac, and Microsoft Windows.
VSDC Video Editor Pro
If you are a Windows user, VSDC Video Editor software is the best option for you. It is a great tool for cropping, trimming, and rotating. You can also record voiceovers and screens.
From the free version, you can use advanced features like motion tracking, masking, audio waveform, and stabilization. This software enhances video quality by correcting colors, mid-tones, and fixing highlights, and shadows. It also has trendy filters, transitions, and effects. Also, it works great on outdated PCs.
Wrapping Up
Learning how to edit YouTube videos with a YouTube video editor is the best way. It is free and you can edit new recorded videos as well as uploaded videos. When you edit already uploaded videos, it may take some time for viewers to see the edited version. However, it is the best way to edit the videos and upload them instantly from YouTube.
Lastly, if you need professional help in elevating your video quality with music tracks and trendy elements, take our graphic design and video editing service. Our professional graphic designers and video editors have years of experience editing amazing videos and they always stay up to date ensuring your audience gets the message in a fun and engaging way. Get us a quote to see the results.
Yes. You can edit videos on YouTube using YouTube Video Editor. It is built-in, free, and best for basic editing. You can easily trim clips, add music, add links, etc. using editing features.
You will find the Zoom in and out right under the video preview. Zooming in while editing videos will help you see the details more properly.
Share your videos on all social media platforms in short and long forms. It will help you attract more audience to your channel.
